For the first time in several years I didn't make it to Oshkosh. I was looking forward to seeing fellow Taylorcraftors and the fine restoration examples of all types that provide (much needed) inspiration, but the timing didn't work out this year.
Otherwise we have had an enjoyable summer here in Thunder Bay with weather conducive to getting out on the big lake for some salmon fishing. Other than that, some home repairs, our veggie patch, and a week of travel to take care of some family business, I've been working steadily on CF-CLR.
Needless to say my revised timeline for CF-CLR has come and gone. I've decided my strategy is now simple... I will go the hangar every day I can, and work. When there is no work left to do on CF-CLR, it will be finished, and not a day later!
My last update was dominated by lots of metal fabrication including the cowlings and various repairs. I continued the sheet metal work theme through July and into August until finally starting a marathon of parts cleaning, etching and priming. Then several days of riveting all the parts together.
Updates are in the
Firewall Forward,
Landing Gear, and
Doors sections. As always, comments & questions are welcome.
A word about cooling:
They key to successful cooling of our air cooled aircraft engines is to get air to flow through the cooling fins!
Sounds simple enough right? The problem is there are a few relatively common issues that can upset things especially if and when baffles/seals/cowlings deteriorate with time and modifications are made without fully considering cooling.
How the air flows around the engine is more important than how much air flows. The most important thing to remember is that there must be a pressure differential (delta) for air to flow. A common problem on older aircraft is the loss of some or all of the pressure differential within the cowling.
The Tcraft, like my 172, needs lower pressure below and behind the engine compared to above and in front of the engine. The most common causes of losses in the differential are poor baffle seals (both condition and fit), holes in the baffles including gaps around accessories, crankcase shapes etc., and holes in the forward part of the lower cowling.
Changes like installing a lightweight starter can create problems. Our cooling air will take the path of least resistance which in this case will be past the starter at the expense of cooling fins.
When I restored my 172 I took a lot of time to seal things up and make sure the baffles and seals fit snugly.
Don't be fooled by appearances. Years ago there was an AD on the Piper Navajo concerning engine overheating. A visual inspection of the baffle seals was required to see if they were "blown back" ie blown inside out allowing cooling air to bypass the engine into the accessory area and out the cowl flap.
With the cowling off the baffles and seals might look ok, but once the cowling is pressurized...sometime during the takeoff roll, the baffle seals blow back and the delta is gone.
Our BC12D's have a couple of weaknesses worthy of special attention.
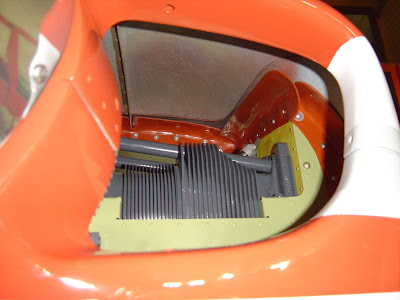
The nose cowl has an intake that sends air below the engine. This is actually what we want to avoid as it has the tendency of reducing the delta. The crank case baffle, if its in good condition, channels air along the lower case, more importantly it chokes the airflow such that the majority of air coming in the "scoop" is forced up past the crankshaft behind the propeller hub and into the upper cowling area. This is good. Trouble is the crankcase baffles are often in poor shape or, as in the case of CF-CLR, missing altogether. I used to tape over the lower intake for winter operations but I now suspect this actually made the engine run cooler!
If an air filter assembly has been installed, another potential problem is introduced. The filter housing needs to be sealed to the cowling in some fashion otherwise your cooling delta is reduced again. CF-CLR had Aeronca exhausts on it when I got it and the holes through the lower cowling most likely introduced yet another detrimental air intake.
So If your Tcraft is having cooling problems, have a look at the chin scoop and how well your crankcase baffle seals around the scoop and the engine case. Check to see if your air filter housing is sealed against the cowling. Check the location and size of tailpipe opening(s) and how the cowling is formed around them, and check your baffle seals to ensure they are installed correctly (see Firewall Forward section) and that they actuall seal against the cowlings. Finally plug any holes where air can by-pass the cylinder cooling fins.
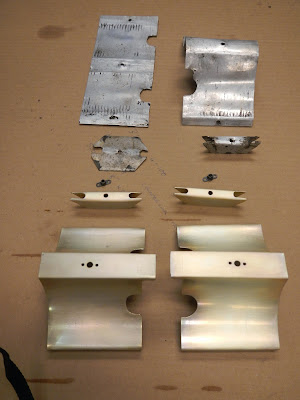
Oh yes one last thing. The A65 has what's called a "summerization kit." It consists of two tabs that are attached to the inboard end of the inter-cylinder baffles. I actually didn't know anything about this when I was fabricating new inter-cylinder baffles for CF-CLR but noticed the gap between the baffles and the crankcase at the inboard end and, as a matter of course (based on what I've shared above), unknowingly incorporated the summerization kit into the baffle.
I expect CF-CLR will run too cool based on the fact that it ran fine with all the problems. Cool is a better problem to have.