Evolution of a Paint Scheme
I received many questions about CF-CLR's paint scheme at Oshkosh and pretty much everywhere I've been with the aircraft. So I thought I'd put together a post on how it came to be.My philosophy for the restoration was to remain within the spirit of original. This translates into variances from original that improve safety, airworthiness, durability but do not significantly alter the original basic configuration or appearance.
 I was lucky enough to benefit from the experience of others, primarily at Oshkosh, and with that chose Ranthane, one of only two urethanes that are approved for use on Polyfibre. There are advantages and disadvantages of using urethane but for me the advantages win out (disregarding the degree of difficulty!!) Note that trying to remain original here means using dope. Significant damage to CF-CLR resulted from ongoing shrinkage of dope over the years, so selection of better options (like polyester instead of linen) while strictly not authentic, is just sensible.
On the question of scheme authenticity. I researched all information, and looked at every image I could find, on the internet and on paper, and picked the collective brain power on the Taylorcraft Forum. It all pointed in one direction... while there were some general themes repeated by the factory in the 1930s &40's there was also a high degree of customization at the discretion of both customers, and painters.
One scuttlebutt is that painters were given full freedom on schemes as long as it was the same on both sides of the aircraft!
Although photos from 1946 are relatively rare, looking through the Alliance Photo Collection at https://www.alliancememory.org/digital/collection/taylor/search you can see even in black and white, that there were many many different schemes applied at the factory.
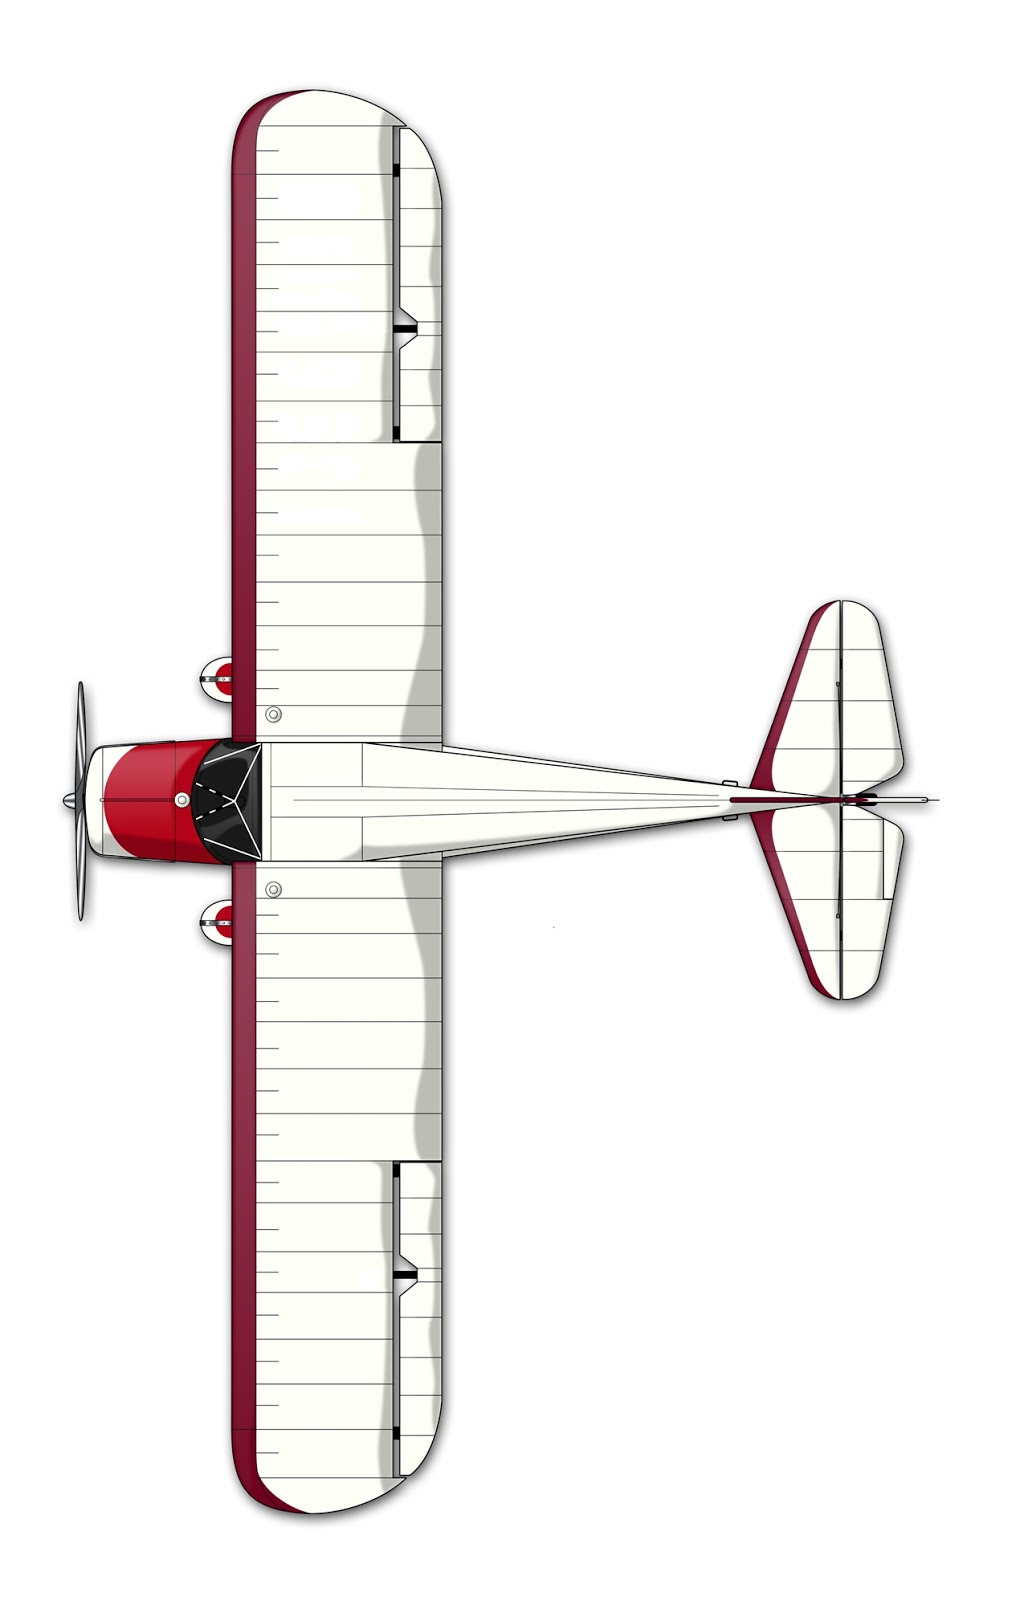
Another source of information is ad copy from the era. These are also mostly monochrome or two colour but provide clues. Not photos, but artist renderings that provide more ideas. This ad from February 1946 depicts the scheme I always liked.

Anthony (NC43501) also on the Taylorcraft Forum, was kind enough to help refine the scheme by creating the digital image below. I printed this and hung it on the wall in the hangar and paint booth and referenced it while pulling tapes. I made small changes to avoid problem areas i.e. avoiding door handles, cowl latches, rivet and screw heads etc. as much as possible.

Colours;
When I stripped the paint from the doors and boot cowl I found some original colours, namely white and light blue. Light blue was not to my taste but the shade of white I tried to match to a Randolph standard colour and the closest seemed to be Randolph White. I wanted to keep things simple (no custom colours) so I picked from the Randolph "Traditional Aircraft Colors." I decided on Boston Maroon and Pontiac Red for the accent (I've seen other aircraft with a maroon-red scheme and I've always found the more subtle contrast very pleasing).
The gory details of preparing for and applying Ranthane are all below and I will once again acknowledge Polyfiber Customer Support. I'll also say that it's important for them to have good support because the information in the Polyfiber manual and on the website is mostly inadequate and in some cases simply incorrect. I understand there is an update to the manual in the works so hopefully this situation will improve.
Having said that I agree with Polyfiber, and there are many examples to prove, that "amateur" builders/restorers can obtain good results.
I hope the information below is helpful in reducing the degree of trial and error involved, but practice is a must!

March2018
 Just when you think you've got a handle on painting.......
At first glance this looks like contamination of some kind and given the problems I encountered early on, I kind of assumed the problem had returned.
So more time was spent cleaning everything, then I replaced all my filters, then I bought a new filter for my compressed air supply, then I tried a different compressor and air hose altogether and nothing changed.

This is a view through a jeweler's loop. What looked like bits in the finish was actually tiny eruptions in the paint.
I contacted Polyfiber and we concluded my catalyst was most likely the culprit. The "fine print" on the cans provides the date of manufacture and I'd never noticed it.
My slow progress plus the fact the catalyst was already nearly 18 months old when I bought it from Aircraft Spruce meant that the two year recommended shelf life was well exceeded. It still appeared fine, crystal clear in an unopened can but... Lesson learned, and an expensive one for sure.
The paint itself apparently lasts a long time but the catalyst is susceptible to absorbing moisture and otherwise going off. Moral of the story is buy catalyst as you need it, don't bother trying to save on shipping as I did and end up having to dispose of >$200 worth, and check dates before you buy!
Anyway just the right wing and a few small parts left to paint so hopefully now back on track.
Thanks again to Hualdo at the Polyfiber tech department.
November 2016
I've had difficult time with topcoat application, most of it my own fault and inexperience with Ranthane preparation and application techniques.
In the winter months I was able to keep the booth at a reasonable temperature, when the hangar was too cold to work in. Things like planing and sanding the spars and other wood parts, cutting and trimming sheet metal parts and chromoly parts, resulted in dust getting trapped in every nook and cranny, apparently laying in waiting for topcoat spraying, at which point it migrated to the finish despite my diligent attempts at cleaning.
So I've learned a lot in the last couple of months and although not perfect by any means, I now have my setup working acceptably. Some of the lessons learned:
- Products sold as "lint-free" are not always free of particles that can mess up an otherwise good finish. Test everything in the booth using a spotlight. See below.
- To get to the bottom of my particulate contamination problems, I put a spotlight in the spray booth and turned out all other lights. Using an air nozzle, blow across anything and everything in the booth and position the light such that the particulate is visible in the beam. Lint-free painters rags, masking paper, paint coveralls, breathing equipment, lights, walls, everything can be tested in this way. I used the compressed air, after I'd washed and vacuumed the inside of the booth a couple of times, and with the extraction fan running, blew out all the nooks and crannies, fixtures and equipment. I kept going over and over every inch until the air was clear. I repeat this procedure before each batch of painting.
- Remove everything that doesn't need to be in the booth, seal/weatherstrip to make as airtight enclosure as possible. I even put duct tape on the doors.
- I went to Merv 10 filters, which slowed the airflow a bit, and created too much delta. So I added three more 25x20 filters to reduce the delta and tendency for air to be drawn through none-airtight/filtered locations.

Spraying Ranthane:
I'm not an experienced painter, but I have painted several aircraft (and a couple of cars). I have used Imron, Alumigrip, JetGlo and I'll say I find those urathane products to be more user- friendly, less sensitive, and better covering compared to Ranthane. Just my opinion but I have applied JetGlo (used on CF-CLRs doors and a few other parts) and Ranthane back to back so it's not just "happy memories!" Of course Ranthane and Aerothane are the only two urethane options for the Polyfiber system so perhaps this is the price paid for flexibility suitable for fabric.
Anyway my problems started with my inexperience and were compounded by the Polyfiber manual which is, frankly, ambiguous at best in providing guidance. The information on the Polyfiber website is different again. I will say however that the Polyfiber tech department was extremely helpful. Particular thanks go out to Hualdo Mendosa for his patience and sound advise. It's not my intention to recount all the gory details of learning how to spray Ranthane but here are some tips:
- DO NOT use the Polyfiber C2210 pre cleaner as the manual says. This stuff was not inexpensive and caused me significant problems. There are several good alcohol-based pre-cleaners on the market including the one recommended to me by the Polyfiber tech department ... Prep Wipe (which arrived with a Polyfiber label on it). Alcohol/water cleaners have the added advantage of eliminating static which is a big plus when wiping down a large area. (I had the fuselage grounded in two places and still I was getting electric shocks from the surface as I was wiping it down. This static charge was surely attracting all the tiny particles in the vicinity too!, not to mention the obvious fire hazards.
- Ranthane needs to be reduced 50% or more for it to flow out nicely, but this also makes it sag-prone. This means three coats (as opposed to the two specified in the manual), one light, one medium and one full. 15-20 minutes between coats seems to work but I think this may be temperature dependent. For the red I applied 4 coats and waited 30 minutes between the first and second coats, 30 minutes between the second and third coats and 15 minutes between the third and final coat. This seemed to be a good recipe for the red but the white seemed to dry faster so I did 15 minutes between coats.
- The sooner you can apply the next coat the better the paint seems to flow, but too soon and it may sag or run away from rivet heads etc.

- 65-70 degrees seems to be a good temperature if you're lucky and have the ability to control temperature. Ranthane seems to flow a little better at cooler temperatures.
- I went down to a 1.3 tip on my gun and turned the air pressure up. 5-10 Psi more than the gun manufacturer says is normal. This definitely atomizes the paint better with a resulting improvement in finish. It also creates more over-spray so the extraction system needs to be able to keep up. More pressure also means higher flow rates so inline fittings, filters, hoses etc. need to be larger inside diameter.
- Take the time to wet-sand blemishes because Ranthane does not hide well.
- Leftover mixed paint can be put in the freezer and used the next day for small parts, inspection plates for example but I would tend to use freshly mixed paint for important surfaces because the viscosity of the stored mixed paint seems to be inconsistent.


Ranthane of course is not cheap so you don't want to be pouring it away at the end if you've mixed too much. It also needs to sit for 20 minutes after the catalyst is added.
I estimated how much paint I'd need for the particular job and mix up about enough for the first two coats. Then measure how much paint I actually used for the first and second coats. If necessary a little more paint can be mixed and added for the final coat. I added a little more reducer for the final coat as well.
I estimated how much paint I'd need for the particular job and mix up about enough for the first two coats. Then measure how much paint I actually used for the first and second coats. If necessary a little more paint can be mixed and added for the final coat. I added a little more reducer for the final coat as well.
Use a ladle or dixie cup as oppose to pouring paint from the cans. Clean the trough in the paint cans before reinstalling the lids. This way your very expensive paint will have a shelf life. This is important with the catalyst as well as the unmixed catalyst dries hard and prevents the lid from sealing.
Of course it's a two part product and if you get even a small amount of catalyst in the paint it's going to start to change. So keep everything clean and separate.
Of course it's a two part product and if you get even a small amount of catalyst in the paint it's going to start to change. So keep everything clean and separate.
For all clean-up (poly brush, poly spray, Ranthane) I use lacquer thinner from the local hardware store as it is a fraction of the cost of MEK or reducer.
I bought a box of 100 ea, 125 micron paint strainers for $13.50 through Amazon. These super-fine ones are not as easy to find locally.
If you wear glasses as I do, have several pairs in the booth ready to go. I clean them with pledge (before going in the booth) which helps reduce the tendency for them to attract over spray, and make them easier to clean after. Alternatively you can clean them as you go with methyl hydrate.
I don't use a full hood because I have enough trouble seeing as it is. I use full hooded tyvek suits that cover everything except my upper cheeks, and brow to which I apply barrier cream.
I fabricated small deflectors for my Hobby-air mask exhausts as I found the air flow would sometimes interfere with the spray gun pattern. (by the way, I use my Hobby Air remote air supply for all painting, Poly Brush, Poly Spray Epoxies and Urethanes. I installed a remote switch in the booth too so I can turn it on only when its connected to my mask... One less disturbance in the booth that could lift dust.)

After all the experimenting with various small parts. I carefully wet-sanded the tail feathers to get rid of the fish eye, orange peel and contamination that resulted from my earlier attempt in the Spring.
Then set them up again in the paint booth for round two.


.

Once I had some experience, I went back to the fuselage which was technically ready for topcoat (three coats of poly brush and 3 cross-coats of poly spray). The Polyfiber manual recommends "scuff-sanding" if time has past since the Poly spray was applied.
I'm not exactly sure what scuff sanding actually means but given the relative inferior hiding capabilities of Ranthane, I decided to not take any chances and wet sanded the whole thing once more and added one additional cross coat (two coats) of poly spray.

I also wanted a neat transition from the exterior finish and accent colours to the interior.
So I masked off the door frames and painted them the same JetGlo grey as the doors, forward door frames, and floors.

Also re-masked the windows after wet sanding the Polyspray edge.


as well as the tail accent.
 After masking the white with 3M coated paper, four coats of red go on for the stripe.
Within 20 minutes of the final coat, the fine line tape is removed. This allows the edge to flow a little. It's easy to mess up the wet paint but I think its worth it for a better edge.
 The following day the red is masked off and maroon applied.
 Finally, after months of diversions, I get to unmask the completed fuselage.
 A couple of hours were spent getting all the tape off and cleaning small areas of over-spray.
 I like the way the door frames turned out.


 A week was spent masking, painting, unmasking. Then masking again, painting and unmasking.
Such is the additional work requirement of three colours compared with two.
 The top cowlings have small sections of maroon. I experimented with different line positions but in the end this seemed to be the best alternative (and most consistent with an authentic scheme).
 Note the spray pattern tests on the wall. Taking the time to get a good gun setup before each batch is very important.
I leave the regulator set, but dismantling the guns each time for cleaning, means a new setup is needed each time.
 Doors done except for upholstery and handles.
 Top cowlings came out ok.
 Lower cowling finished save for installing the latches.
 The red on the boot cowl flowed away from the rivet heads and lower edge of the windshield strip. I think it was cooler temperatures and I probably should have waited longer between coats.
Anyway I wet sanded after 48 hours or so and then shot an extra coat on the rivets, and another full wet coat, and a good result achieved.
 The fine-line tape tends to lift in various locations, even though the last thing I do after tack wiping is press the tapes down one final time.
Anyway these blemishes can be removed within 36 hours or so with methyl hydrate. It's a solvent for not fully cured urethane but won't hurt the fully cured finish.
 A 025" feeler gauge and paper towel is used to clean right up to the line.
 Fixed....
Another solution, that works for harder to clean problems, is a tiny artist brush with a little white paint mixed but with no reducer.
 So I now have a sizable stack of finished parts ready for assembly
 A little left-over red is used to refinish the wing tank cap.
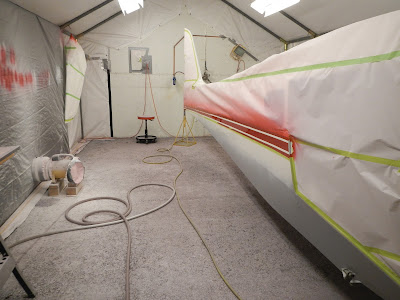
 I also painted the struts. Spraying the struts takes a surprising amount of paint and, as can be seen, a goodly portion of it ended up on the floor.
My paint booth is now the Maroon Room!

Within 20 minutes of the final coat, the fine line tape is removed. This allows the edge to flow a little. It's easy to mess up the wet paint but I think its worth it for a better edge.


Such is the additional work requirement of three colours compared with two.


I leave the regulator set, but dismantling the guns each time for cleaning, means a new setup is needed each time.


Anyway I wet sanded after 48 hours or so and then shot an extra coat on the rivets, and another full wet coat, and a good result achieved.

Anyway these blemishes can be removed within 36 hours or so with methyl hydrate. It's a solvent for not fully cured urethane but won't hurt the fully cured finish.


Another solution, that works for harder to clean problems, is a tiny artist brush with a little white paint mixed but with no reducer.


My paint booth is now the Maroon Room!
Thank you for sharing! This article is very informative and helpful. I hope other articles will be as good as this article.
ReplyDeleteThanks for reading... Still a few posts to go. I'm looking forward to the one called "project complete" or similar!
ReplyDeleteGlad to see this Scott. I'm on the same adventure with my 46 BC12D and have planned on using Aerothane Daytona white with Tennessee red for the trim and the same factory scheme(same as yours). I'm ready for the color coats but waiting for cooler weather and low humidity as I live in Atlanta. The urethane finish is I know tempermental and dangerous to handle but I'm dead set on that high gloss wet look as yours.
ReplyDeleteHi Scott, this is Jim I emailed you and you replied including a link to the blog - thank you. I don’t know much about TCrafts and am interested in what drove your choice of both pattern and colors for your paint scheme. Do you know whether either matches this particular aircraft at some point in its history? Or this particular model? You were brave! I just hired my 180’s paint out, to Gene Kear here in Colorado Springs. http://www.densmore.org/personal/55A/index.html should you be interested. I went with original 1956 pattern but different colors as chosen by my wife and I like how it turned out. I just love your two tone red, the red really pops atop the maroon.
ReplyDeleteThanks Jim
DeleteQuestions on the paint and scheme have been in the top three of most asked. So you've inspired me to expand on the philosophy, research and decisions that led to the final outcome. (new post at the top of this section)
Scott do you have the locations of the inspection covers for the fuselage on the bc12d. Thanks Monty. PS you done a beautiful job on CLR.
ReplyDeleteThanks Monty
ReplyDeleteI installed 5 rings. One on the belly just forward of the tailwheel spring, one on the left side just below the forward stab attach, one each side below the elevator access panels, and one on the left side adjacent to the tailwheel spring bolt. Have not opened any of them yet.
S