January 2026
A reminder that most recent headings appear first, so to get the full story from prior years, scroll down to find previous year's headings :)
Last year at this time I'd just put the fuselage back on its gear and had turned my attention back to the wings.

Also tape the rib caps where the fabric will be stitched only to the cap.
I elected to start with the top surface.


Polyfiber told me nobody would know the difference while at the same time describing how to get the new tape to stick!
Eventually I was able to buy some of the old/better stuff from a private seller. So at least one person knows for sure there's no difference.


To try and save a little time, I purchased strut and panel reinforcing plates. No time saved as I ended up fabricating ones that actually fit.

 Brand new roll of 3" tape with creases throughout!
 Time to do battle with my paint gun!
 After the aluminized coats, one light and one full coat of urethane, then wet sanding before the final two coats.


 Wings done except I ran out of nutplates for the landing/taxi light cover.
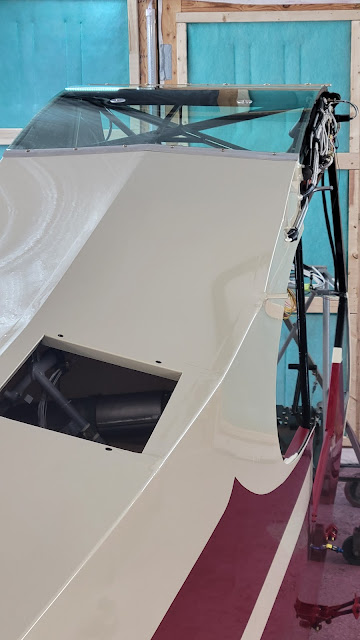
 Engine and boot cowl installed temporarily to pick up screw holes in the boot cowl and covers, fit the windshield, fit engine cowling and baffle seals, and pull lines for the topcoat.


This SuperCub windshield has been a saga from the start. Aircraft Spruce wanted about double the cost of the windshield for shipping! (to MN)


 A couple of coats of satin clear coat to improve durability.


 The cowlings and most of the sheet metal parts still had the original 1960 factory paint. So before stripping, I took some measurements.


Weld repairs made to the original cowl latches, new springs fabricated, and the latches re-plated.


 Made a tool to install bungies and get the gear ready.


Eventually I decided to mask and paint the red over a basecoat of Daytona white, then mask again for the Daytona final coat. Wet sanding with 400 grit between the base coats and final 2 coats.


 On with the somewhat tense job of opening holes and access in the fabric and fitting components. Although it meant disassembly one more time, I test fit as much as I can while the fuselage is still in the rotisserie (saves my back and knees).


New liner tubes installed.


Piper sprayed some kind of Ziebart type stuff to reduce oil-canning
1/8" sound foam is used for the baggage compartment. 1/2" further forward.


Finally the Cub is back on its paws...


Freshen up miscilaneous components


Brake cylinders probably haven't been used for 50 years, so new seals and diaphrams installed


Fabricated new baffles. Not all but most.

The existing throttle cover is serviceable but a little beaten up, so I made a new one.


Plus I wanted to move the compass to free up space for an electronic attitude indicator.

In antisapation of the AD on the rudder post, I decided to strip off the new fabric and install a chromoly post:


The rudder, tailfeathers and gear leg covering was completed ready for the spray gun.

False spars fabricated and fitted.


Before installing the remaining leading edge skins, the wings are installed on the fuselage for a symmetry check:

Leading edge skins fabricated from 2024T3. 020"


To pick up the original screw holes, I made a little hole-finder.


New center shroud fabricated


I couldn't locate an original oil screen shroud so a simplified version is fabricated.


Weld repairs to the nose bowl. I also bonded a doubler on the inside to prevent future cracking.


For topcoat, everthing gets a base coat of white urethane. The string is just to help visualize the paint scheme.


Received a call from a gentleman (John) in Red Lake who, having talked with the past owner of CF-CLR and looked at the restoration book, wanted to sell me his very original Super Cub.


 John saying goodbye. It was easy to see his mixed emotions. Hopefully I'll do him proud.


 The aircraft had unfortunately flipped over onto a dock while on floats. Thankfully no structural damage other than the wing lift struts, but the fuselage superstructure was severely rearranged.


 Onto the wings in an effort to fully evaluate the aircraft.
 More nests!


Typical truss rib damage

 Repairs are made by fabricating reinforcing doublers.

Lots of parts to strip, clean, repair, treat, prime and paint.

Leak testing fuel tanks.

 New elevator trailing edges and some ribs.


Fuselage gets epoxy primer and urethane topcoat.

Stringers straightened and installed.


Another basement project was sewing left and right fuselage fabric which has a seem along the top centre stringer. Daughter Jessie was head seamstress :)
Fabric work on flight controls. Another basement project while the hangar is frozen.


Ailerons were partially dismantled to repair dents and clean/paint steel parts.

New trailing edges were fabricated.


Lots of small jobs like restoring the original magneto switch.


 All new cables
 Original Goodrich brakes salvaged (for better or worse!)

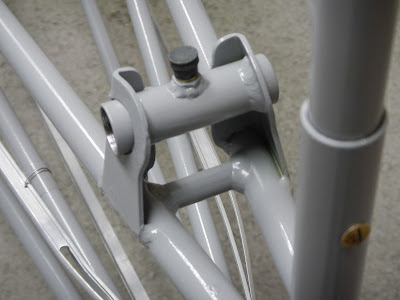
Trim cable guide. This aircraft is actually supported by some useful drawings!

I couldn't remember how the trim system went back together, so I reassembled it, just so I could stop thinking about it!

New floorboards made from burch plywood I selected with grain that looks similar to the original fur.


Late Spring I damaged my knee so had to switch to projects that got me off my feet a little. Dismantled the engine to see what was required.

I found water in the oil tank, but thankfully no sign of corrosion in the bottom end.


Generator and starter get rebuilt with new bearings and brushes.


Internal parts measured and found to be within "new" limits.


Sub Cub seems happy with the outcome.

Back to the wings. Left wing first.

Neither John nor I was impressed with the landing light installation and this area was crushed when the airplane flipped over.  So I built some new parts and used rivets and nutplates to achieve a better, more user friendly and frankly airworthy result.

The wing tips were broken and rotted. Originally made of ash, they can be purchased, but the shipping costs are silly.

 After sorting through a large stack of rough cut boards, I identified 4 pieces that had potential.
 We... Sub Cubby and I, were pleased with the result.
Now in the process of fabricating and installing new leading edge skins and aileron cove false spars.


 The outboard skin shape is enhanced to provide better support for the landing lights. Here the cutout for the lights has yet to be made.

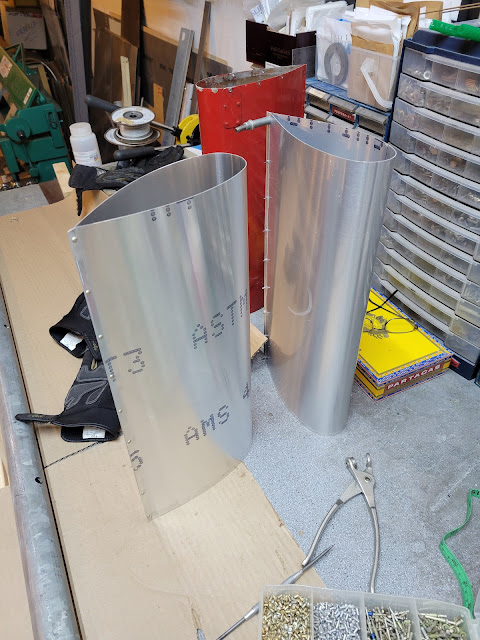
Aileron cove false spar blanks ready for bending (they're too long for my brake so I've arranged access to a larger one):

Bench-edge contraption rigged up to bend the skins and in this case the bungee covers.

Given I was cutting 2024 T3 .020" I cut new interior side panels, and blanks for new bungee covers.

The old bungee covers were usable but a little worse for wear.
 And that's where I stopped for the holidays.... only a little over a years work to go!!


Basically trying to eliminate any surprises during final assembly when the topcoat might be damaged.
I installed my first aircraft windshield around 1981. It was on a DC8-61. The first LP Aero windshield I installed was on a 182 a few years later. I've done several since.

LP Aero came through from this perspective and although wouldn't sell to me directly, I was able to arrange the shipping with them prior to purchasing from AS.
Unfortunately the windshield, which is not a complex design, did not fit. What's worse is that LP Aero apparently has no competent technical support, kept saying it was a trimming problem, and eventually just ignored my communications.
In the end, rather than delay a month while LP Aero puttzed around, I used two heat guns to re-form the left side wing root area. Not something we should need to do on a brand new windshield.
Moving on.


Next up is pulling lines for top coat, then dismantling it all again.


After fitting the cowlings, I installed baffle seals. The originals were felt, and frankly I doubt they did anything but look nasty!


 Also tidied up a few things
 And fabricated a replacement engine breather.


The firewall blanket is another part I purchased to save a little time. Here's the second one I received over a pattern of the PA18 firewall.

In the time spent trying to get a proper part, I could have fabricated several myself.
Let's hope third time is indeed the charm.
The temperature plummeted outside which means my hangar is not where I want to be, so my wife an I are in the tropics for a couple of weeks! Hopfully returning refreshed for the final push to CF-ZRL completion.
Update January 2025
At the end of 2023 I had just started topcoat painting but immediately ran into trouble, and the problems continued.
If you've been following this blog you'll know that I persevere, sometimes perhaps too long before calling for technical support. When I do call, and receive good help, I have acknowledge and thanked people and companies here, including Polyfiber.
Unfortunately my experiences over the last year left me with only self-answered questions because at least half a dozen calls to Polyfiber tech support have gone unanswered. In fact not a single call or email returned in 2024.

Anyway more on the troubles and eventual solutions later.
Life intervened and kept me away from the project for significant parts of the year so coupled with the painting problems nowhere near the progress antisapated.
For the coldest part of what was an ominously warm 2024 winter, I retreated to my home shop and completed some detail work.
I was not happy with the decals available off the shelf, so I made my own. It took a while to identify all the various fonts, sizes, spacings and justifications used by Piper, but eventually I came up with electronic files in duplicate of each of the original decals, and some additions.

In the mean time the company responsible for the dry transfer system I chose shut down, and with it the potential for support. So some trial and error but eventually I achieved reasonable results.

Can you spot the error Piper made on the original panel?


Mocked up the panel just for fun.


Also a good time to start working on the hail dents and dings. Sanding reveals the high and low spots which are marked on the inside before the paint is stripped.


Weld repairs made to the original cowl latches, new springs fabricated, and the latches re-plated.

I made a start on prepping for covering the wings in between waiting for filters and paint stuff.

Magnetometer installed in the right wing


Now back to the topcoat challenges.
Painting has been a struggle. Bottom line is I expected too much from my DIY paint booth and looking back I can see where I got distracted by false assumptions and second guessing my own stuff while believing in the new stuff I purchased.
Eventually I stopped and used the NASA fall back... and "fixed" everything!


Among the problems I encountered was defective 3M fine line tape seen here. not possible to end up with a fine line if the tape is not cut cleanly.
An Led flashlight shows the debris coming off the new filters in my paint booth. I thought surely it would clear itself with use but no, and any movement in and around my hangar, door slamming, helicopters etc. resulted in another batch of particulate being released into the booth.
I had always used HVAC filters from Home Depot but those days are gone, the source of the contamination is the floss material used in the current generation of filters.
I eventually changed my filter frames and sourced paint booth specific filters with a tack coating on the inside face, and finally started realizing better results.
Also better quality tyvek suits, better gloves, a full hood (which is a pain in terms of visibility, but less disruption of the air and reduced potential for contamination), more light, and increased crossflow through the booth. A hole lot of time, energy, and money, and less hair!

Santa Fe Red Ranthane is perhaps the worst colour/paint I've ever sprayed. It is 100% dependent on the colour of the base coat and requires 4-6 coats to achieve the proper shade and coverage and even then tends to flow away from rivets, screw heads, weldments, fittings etc.. even at 2 hours between coats.


Painting interior panels I wanted a low gloss finish. The Polyfiber flattener would not work with the Santa Fe Red Ranthane.
Adding medium amounts resulted in little or no noticeable gloss reduction. Adding the maximum amount resulted in the paint having no covering properties, so even more coats required. Then as the paint cured it just went glossy with what I think was the silica visible in the finish.
So in the end I used plain old enamel to achieve the finish I was hoping for. Not as durable but it's what Piper used on the original panels 65 years ago, so ok for the interior.

 On with the somewhat tense job of opening holes and access in the fabric and fitting components. Although it meant disassembly one more time, I test fit as much as I can while the fuselage is still in the rotisserie (saves my back and knees).
Last time I looked, the brake line covers sold for a reasonable price so I had planned to just buy a pair. When it came time to order them however, the price had quadrupled...


So while I want to support the suppliers that remain in this segment of the industry, there's a limit to my budget. So I made a form to produce ones that would be sure to fit my not-quite original installation.


Next up, doing battle with the headliner. The fuselage tubes suffered from having previous headliners/vinyl covering glue directly to them, so I made a frame from 2024T3 that is sewn into the headliner and picks up the sidewall screws.


Exciting to install stuff, hopefully for the last time.


A little heat is used to get the skylight to conform to the fuselage contour.


1/8" sound foam is used for the baggage compartment. 1/2" further forward.


Now turning my attention back to covering the wings. Paint will have to wait until Spring.
December 2023
Progress has been made though its never as much as we hope. I've had some creaky joint problems so only working half days on the project.
Anyway here's a progress report, mostly in pictures:

Winter time my hangar is too cold so a good time to head to my basement shop to complete small parts and accessories

500 hour kits for the mags


Same for the instrument panel:


2024T3 has quite a bit more memory than the original material, so it is nessesary to pre-form the skins to ensure the correct profile is achieved.


To improve durability in the refeuling area, I duplicated the stiffners Piper used under the outboard skins.


Two wings ready for fabric.

With the wings done I started mocking up the fuselage:


Repairs made to the exhaust shrouds:


And remaining accessories installed


I elected to do a machine sewn seam along the top centreline. The shrinking operation was long and methodical to achieve a straight line.


So now I'm re learning how to paint Ranthane as it's been several years since I did the Taylorcraft. It wasn't a particularly enjoyable experience so I guess I put it out of my mind!
I plan to finish the fuselage paint so that I can begin assembly in between covering and painting the wings.
That's all for now.
Merry Christmas and happy 2024
December 2021
Well I said I wasn't going to restore another tube and fabric aircraft but...
So I flew up to YRL in my 172 to have a look and a couple of weeks later we agreed on the sale of his pride and joy.
Sub Cub came with the airplane.
So did more hornets nests than I could count. Fortunately the residents had vacated.
After completing weld repairs and some small modifications, fuselage was media blasted.
And mud daubers! The final straw perhaps, as at this point I decided to completely dismantle the wings.
The spars were cleaned, etched, alodine conversion coated and epoxy primed.
There are 46 or so ribs, most of which needed repairs. I did them in my basement during January and February when the hangar was cold.
I made a tool to form the doublers tightly around the 'T' sections.
Fabric work on flight controls. Another basement project while the hangar is frozen.
Stab shaft was seized in place, so once I got it out I installed a nipple.
New boot cowl fabricated from 2024 T3, a little more durable than the original.
Of course appearances are important so new paint and hardware.
The cylinders were salvageable but, perhaps I was feeling a little lazy, and four new cylinder assemblies were purchased instead of reworking the old ones.
With the help of some friends I located a small mill in Murillo, just a few miles from Thunder Bay that had "green" Black Ash.
After ripping and routing a half dozen blanks, I chose two to be steamed and formed.
Your work is second to none beautiful workman ship. I am still working on my tcraft. Happy new year. Monty.
ReplyDeleteThank you.
DeleteAmazing work! Love all the attention to detail and finished parts.
ReplyDelete